
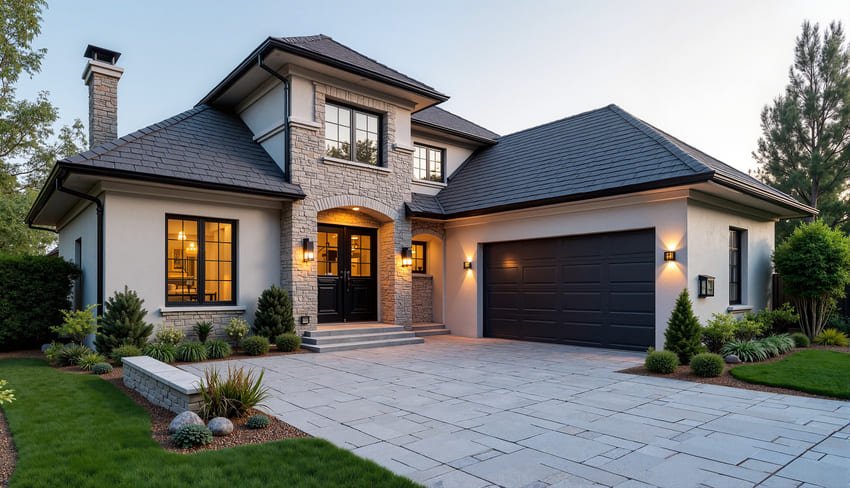
Your driveway is one of the first things people notice about your home. It frames your house, sets the tone for your curb appeal, and takes a beating every single day — from morning commutes to weekend visitors to the occasional delivery truck. If your current driveway is cracked, stained, or just plain boring, it might be time to think about upgrading. And when it comes to durability, beauty, and long-term value, few options compare to a professionally executed driveway paver installation.
This guide walks you through everything you need to know — from choosing the right paver material to understanding the installation process, costs, and maintenance — so you can make a confident decision for your property.
Why Choose Pavers Over Concrete or Asphalt?
Before diving into the details, it helps to understand why pavers have become the go-to choice for homeowners who want more than just a flat slab of gray concrete.
Durability that outlasts the alternatives. A well-installed paver driveway can last 25 to 50 years, far exceeding the typical lifespan of poured concrete (about 20 to 30 years) and asphalt (15 to 20 years). Pavers are individually manufactured under high pressure and cured to achieve exceptional strength, and because they’re installed as separate units rather than one continuous slab, they flex and move with the ground beneath them. That flexibility is the secret to their longevity — when the soil shifts or freezes and thaws, pavers absorb the movement without cracking.
Repairability without the headache. If a concrete slab cracks, you’re looking at tearing out the entire driveway. With pavers, a damaged unit can be lifted out and replaced in minutes, leaving no visible seam or color mismatch. The same goes for stains — a single paver can be swapped out rather than scrubbing the whole surface.
Unmatched aesthetics. Pavers come in a staggering range of colors, shapes, textures, and patterns. You can create a classic herringbone, a sophisticated running bond, a rustic cobblestone look, or a modern large-format design. Borders, contrasting bands, and accent stones let you customize the look to match your home’s architecture perfectly.
Increased property value. Real estate professionals consistently note that paver driveways boost curb appeal and resale value. A beautiful driveway signals that the home has been cared for, and buyers are willing to pay a premium for that first impression.
Choosing the Right Paver Material
Not all pavers are created equal. The material you choose affects everything from appearance to maintenance to cost. Here are the most popular options for driveway paver installation:
Concrete pavers are the most common and versatile choice. They’re available in virtually every color and shape; they’re affordable, and they hold up exceptionally well under vehicle weight. Modern concrete pavers can even mimic the look of natural stone at a fraction of the price.
Brick pavers offer timeless charm and a warm, classic aesthetic. They’re incredibly strong, and their color doesn’t fade over time since the pigment runs through the entire brick. Brick pairs beautifully with traditional and colonial-style homes.
Travertine and natural stone pavers deliver a high-end, luxurious look that’s hard to beat. Natural stone stays cool underfoot, develops a beautiful patina over time, and adds instant elegance. It’s a premium option, both in material cost and installation complexity, but the results are stunning.
Porcelain pavers are a newer option that’s gaining popularity fast. They’re extremely dense, stain-resistant, and available in designs that convincingly mimic wood, stone, and marble. Porcelain is an excellent choice for homeowners who want a modern, low-maintenance surface.
Permeable pavers are designed with gaps that allow water to drain through the surface and into the ground below. They’re an environmentally friendly choice that reduces runoff, helps manage stormwater, and can even satisfy local drainage regulations. Many municipalities offer incentives for permeable driveway paver installation.
Design Considerations: Patterns, Colors, and Layout
One of the greatest advantages of pavers is the creative freedom they offer. Here are a few design elements to consider:
Patterns. The herringbone pattern is the strongest and most durable option for driveways because its interlocking geometry distributes weight exceptionally well. The running bond is clean and classic, while the basketweave offers a more decorative feel. For a truly custom look, many homeowners combine patterns — a herringbone field with a soldier-course border, for example.
Colors. Lighter pavers reflect heat and stay cooler in summer, but they show dirt more readily. Darker pavers hide stains well and create a dramatic, modern look, but they absorb heat. Many homeowners choose a mid-tone color that balances both concerns, then add contrast with a border in a complementary shade.
Scale. The size of the pavers matters more than you might think. Large-format pavers make a driveway feel more expansive and modern, while smaller pavers create a more traditional, textured appearance. Mixing sizes within a pattern adds visual interest and a handcrafted feel.
Edging and borders. A well-designed border frames the driveway and ties it to the rest of your landscape. Consider matching your paver border to your walkway, patio, or front entry for a cohesive outdoor design.
The Driveway Paver Installation Process: Step by Step
Understanding what goes into a proper driveway paver installation helps you appreciate the craftsmanship involved — and it helps you spot a subpar job before it’s too late. Here’s what a professional installation looks like:
1. Site assessment and excavation. The crew begins by evaluating the site, checking drainage patterns, and marking utility lines. The existing driveway surface and soil are then excavated to a depth of roughly 8 to 12 inches, depending on the soil conditions and expected vehicle loads.
2. Base preparation. This is the most critical step. A proper base typically consists of 6 to 8 inches of compacted crushed stone or gravel, installed in layers and compacted with a plate compactor between each layer. The base is what carries the weight of your vehicles — skimping here leads to settling, dips, and uneven surfaces down the road.
3. Edge restraints. Strong edge restraints are installed along the perimeter to keep the pavers from shifting outward over time. This is a detail that separates professional work from amateur jobs.
4. Sand bedding. A 1-inch layer of coarse, washed sand is screeded over the compacted base to create a smooth, level bed for the pavers. The sand must be perfectly level — any variation will show up in the finished surface.
5. Paver installation. The pavers are laid according to the chosen pattern, starting from a straight reference line. Skilled installers work methodically, ensuring consistent joint spacing and a perfectly flat surface. This is where the artistry of driveway paver installation really shows.
6. Compaction. Once all the pavers are in place, the entire surface is compacted with a plate compactor fitted with a rubber pad to protect the paver faces. This seats the pavers firmly into the sand bed.
7. Joint sand and final compaction. Fine polymeric sand is swept into the joints between the pavers)Skip — this sand locks the pavers together and prevents weed growth and insect intrusion. After sweeping, the surface is compacted again)Skip, and more sand is added until the joints are completely filled. Polymeric sand hardens when activated with water, creating a strong, flexible bond.
8. Sealing (optional). Many homeowners choose to seal their pavers to enhance color, protect against stains, and simplify future cleaning. Sealing is especially recommended for lighter-colored pavers and natural stone.
How Much Does Driveway Paver Installation Cost?
Costs vary widely based on material choice, driveway size, site conditions, and regional labor rates. As a general guideline, expect to pay more per square foot for pavers than for concrete or asphalt — but remember that pavers last longer, require less maintenance, and add more value.
The main cost factors include the paver material itself (concrete is the most budget-friendly, natural stone the most premium), the amount of excavation and base work required, the complexity of the pattern, and whether the old driveway needs to be removed and hauled away. Permeable systems and intricate designs with borders and accents also add to the total.
The best way to get an accurate picture is to request a detailed quote from a qualified contractor who can assess your specific site. A slightly higher upfront investment in quality materials and proper base preparation pays for itself many times over in longevity and appearance.
Maintenance: Keeping Your Paver Driveway Beautiful
One of the biggest selling points of pavers is how low-maintenance they are. Here’s what’s typically involved:
Routine care. Sweep or blow off debris regularly and rinse the surface with a garden hose. For deeper cleaning, a pressure washer on a gentle setting works wonders — just be careful not to blast the joint sand out.
Weed and ant control. Because polymeric sand fills the joints, weeds and ants rarely become an issue. If a weed does appear, pull it promptly and replace the sand in that joint.
Spot repairs. If a paver cracks or gets badly stained, it can be lifted out and replaced. Keep a few spare pavers from your original installation for perfect color matching.
Re-sanding. Every few years, you may need to add a bit of joint sand and re-compact. It’s a simple, inexpensive task that keeps the driveway stable and looking its best.
Sealing. If your driveway is sealed, plan to reapply sealer every 3 to 5 years to maintain the color and protection.
Is a Paver Driveway Right for You?
If you want a driveway that looks beautiful, lasts for decades, and adds real value to your home, pavers are hard to beat. The upfront cost is higher than traditional materials, but the return on investment — in durability, aesthetics, and resale value — makes it one of the smartest exterior upgrades you can make.
The success of your project, however, depends heavily on the quality of the installation. Proper base preparation, correct sand bedding, precise pattern work, and thorough compaction are the difference between a driveway that looks great for fifty years and one that settles and shifts within a few seasons. That’s why it’s worth investing in experienced professionals who specialize in this work.
If you’re ready to transform your driveway — or if you’re still weighing your options and want expert guidance on materials, patterns, and budgeting — reach out to a trusted local contractor for a consultation. A great driveway paver installation starts with a great conversation about your home, your style, and your goals. With the right team and the right materials, you’ll enjoy a stunning, durable driveway that welcomes you home every single day.
Common Questions About Paver Driveways
Will pavers support the weight of my vehicles?
Absolutely — when installed with a proper base, paver driveways easily support cars, trucks, and even RVs. The key is the depth and compaction of the base layer, which is why professional installation matters.
Are pavers slippery when wet?
Most paver surfaces provide good traction, and textured options offer even more grip. If slip resistance is a concern, choose pavers with a tumbled or textured finish.
How long does installation take?
A typical residential driveway can be completed in a few days, depending on size and complexity. Your contractor should give you a clear timeline before work begins.
Can pavers be installed over my existing concrete?
In some cases, yes — if the existing slab is in good condition and proper height allowances are made. A professional assessment will determine whether overlay installation is viable for your site.